Thailand Visa Run 2026: 5 Cheap Routes I've Actually Done
The immigration officer at Don Mueang Airport stamped my passport for what I thought was a routine 30-day tourist entry. Three months later, after two extensions and a growing obsession with staying in Thailand, I found myself googling “cheapest visa run from Bangkok” at 2am.
That first visa run to Vientiane in April 2022 taught me everything the travel blogs don’t mention: the actual walking route at Nong Khai border, where to exchange money without getting ripped off, which bus company doesn’t leave you stranded, and why leaving on a Thursday instead of Friday saves you a day’s accommodation cost.
I’ve now done eight visa runs from Thailand. Some were smooth and cheap. Others involved missed buses, confusion at immigration, and spending more than necessary because I didn’t know the shortcuts. This guide covers the five routes I’d actually do again, with step-by-step instructions based on what I learned the hard way.
Understanding Thailand’s Visa Situation in 2026
Before diving into specific routes, here’s what you need to know. Thailand offers visa-exempt entries for many nationalities—currently 60 days for UK, US, EU, Australian, and most Western passport holders. You can extend this once for 30 days at any immigration office for 1,900 baht (about £43).
That gives you 90 days total. After that, you need to leave and re-enter to get a fresh stamp.
The rules tightened slightly in late 2024. Immigration now scrutinizes people doing back-to-back visa runs. I’ve not had issues doing 2-3 runs per year, but I met someone at Nong Khai border who’d done six consecutive runs and got questioned extensively. They were let in, but warned this was their last tourist entry.
My approach: do a visa run when needed, but space them out. Mix in a proper tourist visa from a Thai embassy abroad if you’re planning to stay long-term. And always have proof of onward travel and accommodation—I’ve been asked for both multiple times.
Route 1: Nong Khai to Vientiane, Laos (£45-65 Total)
This is the classic budget visa run, and I’ve done it three times. It’s cheap, straightforward, and can be completed in 24 hours if you’re efficient—though I prefer taking two days to avoid exhaustion.
Total Cost Breakdown:
- Bus Bangkok to Nong Khai: 550-650 baht (£12-15)
- Tuk-tuk to border: 100 baht (£2.30)
- Laos visa on arrival: $42 USD (£33) plus photo
- Accommodation in Vientiane (optional): 300-600 baht (£7-14)
- Bus back to Bangkok: 550-650 baht (£12-15)
Step-by-Step Process:
Day 1: Bangkok to Nong Khai
Book your bus at Mo Chit Northern Bus Terminal (easily reached by BTS to Mo Chit station, then taxi). Multiple companies run this route—I’ve used Nakhonchai Air and Transport Co three times each. Both are fine. Overnight buses (departing 7-9pm, arriving 5-7am) cost 650 baht and save you a night’s accommodation. Day buses (departing 8-10am, arriving 6-8pm) cost 550 baht.
I prefer the overnight bus. You sleep through the journey, arrive early at Nong Khai, and can be at the border by 8am when it opens. Book tickets at the terminal or online through 12go.asia: I’ve used both methods without issues.
The overnight bus is basic but functional. Bring a light jacket (aircon runs cold), earplugs (Thai pop music plays for the first hour), and download something to watch on your phone. Don’t expect much sleep, but you’ll doze enough.
Day 2: Crossing to Laos
The bus drops you at Nong Khai bus terminal around 6-7am. Tuk-tuks outside will offer rides to the Friendship Bridge border—negotiate to 100 baht. Don’t pay more. The ride takes 10 minutes.
At the Thai immigration checkpoint, join the exit queue. This moves quickly—usually 5-10 minutes unless you arrive when a tour bus does. Hand over your passport, get your exit stamp. You’re now officially out of Thailand.
Walk across the bridge (yes, literally walk—it’s about 500 meters). On the Laos side, you’ll reach immigration. This is where it gets slightly complicated.
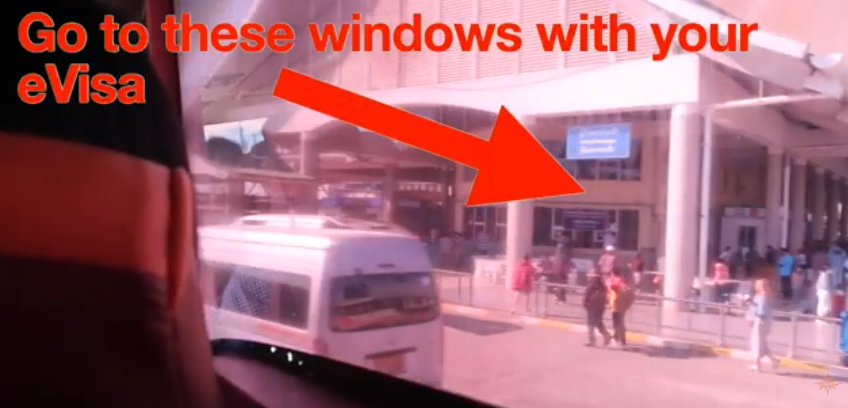
If you have an E-Visa for Laos, look for these windows:
Getting Your Laos Visa:
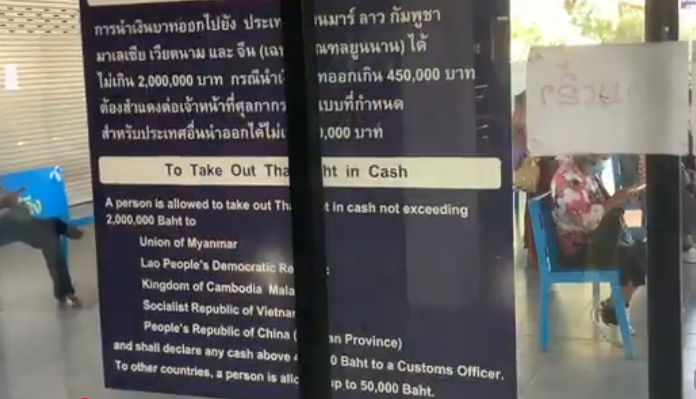
Laos doesn’t offer visa exemption for most nationalities. You need a visa on arrival. The official cost is $42 USD. Crucial detail: they only accept US dollars for the visa, not baht or Lao kip. Bring exact notes if possible—they give change but the rate is poor.
You also need one passport photo. If you forgot (like I did on my first run), there’s a photo booth inside the immigration building—100 baht for instant photos.
Fill out the arrival card at the counter. It asks for your accommodation in Laos. I write “Vientiane guesthouse” if doing a quick turnaround, or the actual hotel name if staying overnight. They’ve never verified this.
Hand over your passport, photo, arrival card, and $42. Wait 15-30 minutes while they process it. You’ll get your passport back with a 30-day Laos tourist visa stamped inside.
Now you’re in Laos. If you’re doing the express 24-hour run, you can literally walk back across the bridge immediately and re-enter Thailand with your fresh 60-day stamp. I’ve done this twice—it works, it’s legal, but it’s exhausting.
The Better Option: Stay One Night in Vientiane
Take a tuk-tuk from the border to central Vientiane (150-200 baht, 20 minutes). I’ve stayed at Mixay Guesthouse twice (300 baht per night, basic but clean) and Ansara Hotel once (800 baht, actually nice with good wifi).
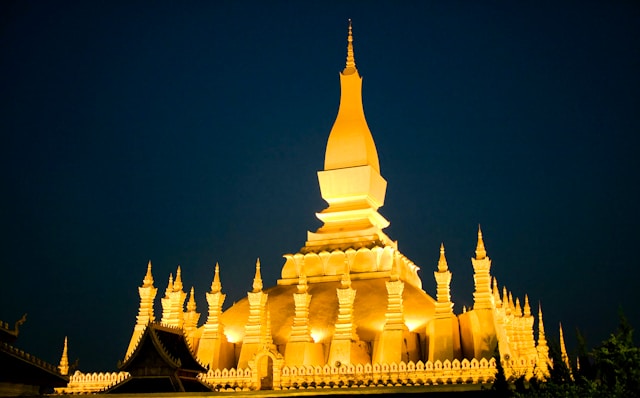
Spend the afternoon exploring. Vientiane is genuinely pleasant: Pha That Luang temple is impressive, the Mekong riverside is lovely at sunset, and the night market has cheap food and beer Lao for 15,000 kip (£1.20) per large bottle.
Dinner at a riverside restaurant costs 40,000-60,000 kip (£3-5) for a full meal. The food is similar to Thai but with French influences—baguettes are everywhere and surprisingly good.
Day 3: Return to Thailand
Take a tuk-tuk back to the Friendship Bridge (150-200 baht). Get your Laos exit stamp. Walk back across. At Thai immigration, join the entry line.
This is where you might get questions. Have ready:
- Proof of onward travel (screenshot of flight/bus booking out of Thailand)
- Proof of accommodation (hotel booking for first few nights)
- Cash or bank statement showing funds (they can ask for proof of 20,000 baht per person)
I’ve been asked for onward travel twice, accommodation once, never for proof of funds. But have them ready just in case.
You’ll get your fresh 60-day stamp. You’re back in Thailand. Take a tuk-tuk to Nong Khai bus terminal, catch a bus back to Bangkok (same prices and companies as the outbound journey).
Nong Khai Tips I Learned:
- Exchange money at the border if needed, not in Vientiane—better rates
- The Thai immigration side has toilets but the Laos side doesn’t until after you clear immigration
- Bring small USD notes—$50 or $100 bills get poor exchange rates for change
- If the border looks busy (tour bus groups), walk to the “Thai/Lao nationals” lane which often moves faster for visa-on-arrival applications
Route 2: Ranong to Myanmar (Kawthaung) - The Quickest Turnaround (£55-75)
This is the fastest visa run geographically but requires more planning. I did this in June 2024 when I was in southern Thailand and didn’t want to go all the way to Laos.
Total Cost Breakdown:
- Bus/minivan Bangkok to Ranong: 450-800 baht (£10-18) depending on service
- Motorbike taxi to pier: 60 baht (£1.40)
- Longtail boat to Myanmar: 300-400 baht (£7-9)
- Myanmar entry fee: $10-20 USD (£8-16) - varies by agent
- Return boat: 300-400 baht (£7-9)
- Bus back to Bangkok: 450-800 baht (£10-18)
Why This Route:
It’s geographically the closest visa run from Bangkok—about 8 hours by bus to Ranong. The Myanmar border at Kawthaung is literally visible from the Thai pier. The entire border crossing can be done in 2-3 hours round trip.
But there’s a catch: you don’t technically enter Myanmar. You land on their island, pay the fee, get your passport stamped, wait around for 30 minutes, then return to Thailand. It feels slightly absurd, but it’s completely legal and gets you your fresh Thai stamp.
Step-by-Step Process:
Getting to Ranong:
Multiple bus companies run Bangkok to Ranong. I used Phantip 1970—overnight bus departing Sai Tai Mai terminal at 8pm, arriving Ranong around 6am. Cost: 650 baht. The bus is older and less comfortable than the Nong Khai route. Bring extra padding for your seat.
Alternatively, fly to Ranong. I checked in June 2024 and flights were 1,800-2,500 baht (£40-55) from Don Mueang. Makes sense if you value time over money or you’re already in southern Thailand.
At Ranong:
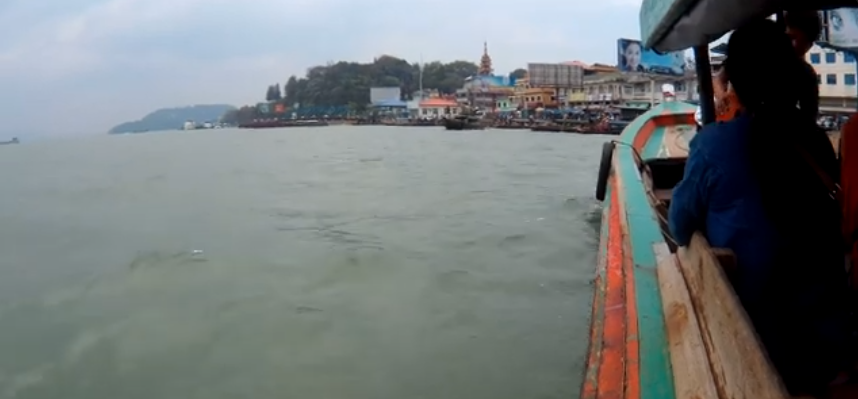
From the bus terminal, take a motorbike taxi to Saphan Pla pier (the main departure point). Cost: 60 baht, 10-minute ride. The pier is obvious—longtail boats lined up, touts calling out “Myanmar! Myanmar!”
Don’t book through the touts. Walk to the small office at the pier—it’s run by official agents who coordinate with both Thai and Myanmar immigration. The current rate (as of my June 2024 visit) was 400 baht per person for the round-trip boat, including the Myanmar entry arrangement.
They’ll ask for your passport. Don’t panic—this is normal. They need it to process paperwork with Myanmar immigration. You get it back before boarding the boat.
The Boat Crossing:

The longtail boats wait until they have 8-10 people before departing. If you arrive early (7-8am), you’ll wait 20-40 minutes. If you arrive late morning when day-trippers and visa runners cluster, boats leave constantly.
The crossing takes 10 minutes. The water can be choppy—I got drenched when waves crashed over the side. Bring a waterproof bag for your phone and valuables.
You land at Kawthaung pier in Myanmar. A guide (arranged by the Ranong office) meets you, collects everyone’s passports, and walks you to Myanmar immigration.
Myanmar Side:
Here’s where it gets slightly sketchy-feeling but is actually fine. The guide takes all passports into the immigration office. You wait outside in a covered area with plastic chairs. After 20-30 minutes, he returns with stamped passports.
The Myanmar entry fee varies. Officially it’s meant to be $10 USD, but I paid $20. Other people in my group paid $10 or $15—it seemed arbitrary. The guide didn’t explain the difference, and pushing back felt unwise in a foreign immigration office. Budget for $20 to be safe.
You’re given 30 minutes to “explore” Kawthaung. There’s a small market, a 7-Eleven-style shop, and a temple. I bought a Myanmar beer (1,000 kyat, about £0.50) more for the novelty than enjoyment.
After 30 minutes, the guide rounds everyone up, you return to the boat, cross back to Ranong. At the Thai immigration office on the pier, you get your fresh 60-day stamp. Total time: 2.5-3 hours from arriving at Ranong pier to being back on Thai soil with your new stamp.
Ranong Tips:
- Bring USD cash—the agents prefer it and rates are poor if exchanging baht
- Go early (arrive at pier by 8am) to minimize waiting time for boats to fill up
- The Myanmar side has bathrooms but they’re grim—use the Thai facilities before crossing
- If staying overnight in Ranong (which I did, as I was tired from the overnight bus), Coco Guesthouse was 400 baht and perfectly acceptable
Honest Assessment:
This route is efficient if you’re already in southern Thailand or want the quickest possible turnaround. But from Bangkok, the Laos run offers better value and a more interesting experience. The Myanmar run feels transactional—you’re not really visiting Myanmar, just getting stamped.
Route 3: Hat Yai to Penang, Malaysia by Train (£65-90)
This is my favorite visa run for one reason: the train journey is genuinely beautiful. I did this in November 2023 as much for the experience as the visa stamp.
Total Cost Breakdown:
- Train Bangkok to Hat Yai: 600-1,200 baht (£14-28) depending on class
- Tuk-tuk to Hat Yai immigration: 80 baht (£1.80)
- Train Hat Yai to Butterworth: 60 MYR (£11)
- Ferry to Penang: 1.20 MYR (£0.22)
- Accommodation in Penang: 800-1,500 baht (£18-34)
- Return journey: Same costs
- Food and exploring: Variable
Why This Route:
Malaysia offers visa exemption for most Western nationalities—90 days for UK passport holders. You can legitimately stay and explore rather than doing a quick turnaround. Penang is worth several days—incredible food scene, UNESCO heritage Georgetown, beaches, and proper culture.
The train journey passes through stunning jungle and rural landscapes. If you’ve only seen Thailand from buses or planes, the train offers a completely different perspective.
Step-by-Step Process:
Bangkok to Hat Yai:
Book trains through the official State Railway of Thailand website or at Hua Lamphong station. Multiple options:
- Overnight sleeper (departing 2:30pm or 6:15pm, arriving 8am or 12pm next day): 600-1,200 baht depending on 2nd or 1st class
- Day train (less comfortable, same prices)
I took the 6:15pm overnight sleeper in second-class air-con. Cost: 850 baht. The bunk beds are narrow but functional. Attendants convert the seats to beds around 8pm. I slept better than expected—the rocking motion is soothing once you adjust.
Bring snacks and water. The dining car serves food but it’s expensive (120-180 baht for simple meals). Vendors board at stations selling grilled chicken, sticky rice, and fruit for 40-60 baht.
Hat Yai to Malaysian Border:
The train arrives at Hat Yai station. You need to clear Thai immigration before continuing to Malaysia. Immigration is at Padang Besar station, one hour north by local train. But here’s the confusing part: there are two Padang Besar stations—one Thai, one Malaysian, separated by 500 meters.
Take a tuk-tuk from Hat Yai station to Padang Besar (Thai side). Cost: 80 baht for the 45-minute journey. Alternatively, local trains run hourly for 30 baht, but the schedule is erratic.
Crossing to Malaysia:
At Padang Besar (Thai side), get your exit stamp at the immigration office near the station. This is straightforward—rarely any queue.
Walk across the border zone (clearly marked). You’ll reach Padang Besar (Malaysian side). Malaysian immigration is equally simple—stamp in, 90-day entry, no questions asked in my experience.
Now catch a train to Butterworth. Trains run every 2-3 hours. Cost: 60 MYR (£11) for the 3-hour journey. The Malaysian trains are more modern than Thai trains—comfortable seats, working air-con, clean toilets.
Arriving in Penang:
Butterworth is on mainland Malaysia. Penang island is a short ferry ride away. From Butterworth station, walk 5 minutes to the ferry terminal (signs are clear). Ferries run every 20 minutes, 6am to midnight.
Cost: 1.20 MYR (£0.22). The crossing takes 15 minutes. You’ll arrive at Georgetown, Penang’s historic heart.
I stayed at Ryokan Muntri (1,200 baht per night, boutique hostel with Japanese aesthetic) and Armenian Street Heritage Hotel (1,800 baht, gorgeous restored townhouse). Both were excellent.
What to Do in Penang:
This isn’t a quick visa run—plan for at least 2-3 days to make the journey worthwhile.
Must-dos:
- Street food in Georgetown: Char kway teow, laksa, nasi kandar. Meals cost 8-15 MYR (£1.50-3). The food is legitimately some of the best I’ve had in Southeast Asia.
- Heritage architecture: Georgetown’s UNESCO streets are photogenic chaos—Chinese shophouses, Indian temples, British colonial buildings, street art murals.
- Penang Hill: Funicular railway costs 30 MYR return. Views are spectacular but it’s crowded on weekends.
- Beaches: Batu Ferringhi has tourist-beach vibes. I preferred quieter Teluk Bahang.
Return Journey:
Reverse the process. Ferry to Butterworth, train to Padang Besar (Malaysian side), walk across border, train or tuk-tuk to Hat Yai, overnight train back to Bangkok.
Total journey time each way: 18-24 hours depending on connections.
Penang Tips:
- Book the overnight train in advance (2-3 days minimum)—it sells out, especially on weekends
- Bring Malaysian ringgit or use ATMs on arrival—many places don’t take cards
- The Thai-Malaysia border crossing has been smooth both times I’ve done it, but have onward travel proof ready
- If you’re tight on time, fly back from Penang to Bangkok—AirAsia flights are often 1,200-1,800 baht (£28-42)
Honest Assessment:
This route isn’t the cheapest or fastest. But it’s the most enjoyable. The train journey is an experience in itself, and Penang deserves exploration. If you’re treating the visa run as a mini-holiday rather than a bureaucratic chore, this is the one to choose.
Route 4: Fly to Kuala Lumpur (£95-140)
Sometimes you just want efficiency. When I needed a visa run in February 2025 but was tight on time, I flew to Kuala Lumpur. It’s more expensive but significantly faster—done in 36-48 hours.
Total Cost Breakdown:
- Flight Bangkok to KL: 2,000-3,500 baht (£45-80) return on AirAsia
- Airport transfer: 100-150 baht (£2.30-3.50) to/from Bangkok airport
- KL accommodation: 1,000-1,500 baht (£23-34) for basic hotel
- Food and transport in KL: 500-800 baht (£11-18)
- Total: 3,600-5,950 baht (£83-137)
Step-by-Step Process:
Booking Flights:
AirAsia dominates this route. Flights depart Don Mueang 6-8 times daily. Flight time: 2 hours 15 minutes.
Book directly through AirAsia’s website or app. Prices fluctuate wildly—I’ve seen returns for 1,800 baht and 4,200 baht for the exact same dates. Book 2-3 weeks ahead for best rates. Tuesday/Wednesday flights are typically cheaper than Friday/Sunday.
Crucial: Book flights that give you time for airport immigration processing. I made the mistake of booking a 3-hour turnaround on my first attempt—missed the return flight because immigration queues at KLIA were longer than expected.
Better strategy: Fly out morning (8-10am departure), return next afternoon/evening (3-7pm departure). This gives you one night in KL with buffer time for delays.
Bangkok Side:
Get to Don Mueang at least 2 hours before departure. AirAsia counters close 45 minutes before flight time—they’re strict about this.
Check-in is usually smooth, but bring:
- Printed or mobile boarding pass
- Proof of onward travel from Malaysia (your return flight confirmation works)
- Print out or have digital accommodation booking in KL
I’ve never been asked for accommodation proof, but I’ve watched others get questioned without it.
Thai exit immigration at Don Mueang is fast—usually 5-10 minutes. You’ll get your exit stamp without drama.
Malaysia Side:
Kuala Lumpur International Airport (KLIA) is where AirAsia flights arrive. Malaysian immigration is generally smooth for tourist entries.
They’ll stamp you in for 90 days (UK passport). I’ve been asked twice where I’m staying—have your hotel name ready. Once I was asked to show my return flight—had it on my phone.
Take the KLIA Ekspres train to KL Sentral (city center). Cost: 55 MYR (£10.30), 28-minute journey. Trains run every 15-20 minutes. Alternatively, airport buses cost 10-12 MYR (£2-2.30) but take 60-75 minutes.
Where to Stay in KL:
I’ve stayed in two budget places and one mid-range:
Reggae Mansion (Chinatown): 800 baht per night for dorm bed, 1,200 baht for private room. Central location, decent wifi, rooftop bar. The dorms are noisy but fine for one night.
Paper Plane Hostel (Bukit Bintang): 1,000 baht for dorm, 1,400 baht private. Cleaner and quieter than Reggae Mansion. Walking distance to Pavilion KL shopping mall.
Prescott Hotel (Bukit Bintang): 2,200 baht per night. Proper hotel with comfortable bed, good shower, breakfast included. This is what I booked when I was exhausted from back-to-back visa runs and wanted comfort.
What to Do in KL (Quick Version):
If you’re only there 24 hours:
Must-sees:
- Petronas Towers: Go at sunset. Free to view from outside, 85 MYR if you want skybridge access (I skipped it).
- Batu Caves: 30-minute train ride from KL Sentral (5 MYR). Hindu temple in limestone caves. 272 steps to climb. Monkeys everywhere—watch your belongings.
- Jalan Alor food street: Night market with incredible street food. Char kway teow, satay, hokkien mee. Meals cost 15-25 MYR (£2.80-4.70).
Transport in KL: The metro/LRT system is excellent and cheap (2-5 MYR per journey). Grab (Southeast Asia’s Uber) is everywhere—a 15-minute ride costs 8-12 MYR (£1.50-2.30).
Return to Thailand:
Reverse the process. Get to KLIA 2 hours before flight. Malaysian exit immigration is quick. Flight back to Bangkok, Thai entry immigration stamps you in with fresh 60 days.
KL Tips:
- Set flight price alerts on AirAsia—I’ve seen flash sales drop return flights to 1,500 baht
- Don’t book late-night or early-morning flights unless you’re comfortable navigating airports when tired
- Bring a light jacket for KLIA Ekspres train—aircon runs freezing
- Malaysian food is fantastic and cheap—eat everything
Honest Assessment:
This route costs more but saves time. If you value your time highly or you’re flying somewhere from Bangkok soon anyway and just need a quick reset, it makes sense. For budget travelers with flexible schedules, the land border runs offer better value.
Route 5: Mae Sai to Tachileik, Myanmar (£40-60)
This is the northern equivalent of the Ranong-Myanmar run. I did this in September 2024 when I was exploring Chiang Rai and needed a visa extension.
Total Cost Breakdown:
- Bus Bangkok to Chiang Rai: 450-700 baht (£10-16)
- Minivan Chiang Rai to Mae Sai: 100 baht (£2.30)
- Myanmar entry fee: 500 baht or $10 USD (£2.30-8)
- Tuk-tuk around Tachileik (optional): 200-300 baht (£4.50-7)
- Return transport: Same costs
Why This Route:
Mae Sai is Thailand’s northernmost town, literally the end of the road. The border crossing is simple—walk across a bridge, get stamped into Myanmar’s Tachileik, explore for a few hours, walk back with your fresh Thai stamp.
It’s cheaper than Ranong and less touristy. Tachileik is a proper functioning Myanmar town, not a tourist visa-run factory. If you’re in northern Thailand, it’s the obvious choice.
Step-by-Step Process:
Getting to Mae Sai:
From Bangkok: Overnight bus to Chiang Rai (12-14 hours, 650-850 baht). Multiple companies run this—I used Greenbus and it was comfortable enough.
From Chiang Rai: Minivan to Mae Sai (1.5 hours, 100 baht). These leave from the old bus station every 30-60 minutes from 7am to 5pm.
If you’re already in Chiang Mai or northern Thailand, adjust accordingly. Chiang Mai to Mae Sai is 5-6 hours by bus (200-300 baht).
The Border Crossing:
Mae Sai’s border is obvious—a large bridge over the Mae Sai River with Thai immigration on one side, Myanmar on the other.
Thai immigration is straightforward. Join the exit queue (usually short), get your stamp, walk across the bridge.
Myanmar Side:
Tachileik immigration is less organized than Ranong. You’ll need:
- Passport
- Fee payment: They accept both Thai baht (500) or USD ($10). The baht option is better value—500 baht is about $11.50, so you save slightly.
Unlike Ranong where agents handle everything, here you’re on your own. Join the visa-on-arrival queue. Hand over passport and fee. Wait 15-30 minutes. Collect passport with entry stamp.
You can stay in Tachileik for up to 14 days on this border entry, but 99% of visa runners just stay a few hours.
Exploring Tachileik:
I spent three hours wandering around. Highlights:
Shwe Daung Gu Pagoda: Large golden temple complex. Free entry. Peaceful and interesting to explore.
Local markets: Fresh produce markets near the border. Fascinating to see daily Myanmar life—women with thanaka (traditional face paint), monks collecting alms, vendors selling pickled tea leaves.
Food: I had mohinga (Myanmar fish soup breakfast) at a street stall—1,500 kyat (£0.70). Delicious and completely different from Thai food.
Money: Some vendors accept Thai baht, but the exchange rate is poor. Better to change 500-1,000 baht to kyat at one of the money changers near the border. I changed 1,000 baht and got 42,000 kyat (roughly 42:1 rate, which was fair compared to official rates I checked later).
Return to Thailand:
Walk back to the bridge. Get your Myanmar exit stamp (quick, no queue when I went). Cross back over. At Thai immigration, get your fresh 60-day stamp. Done.
The entire process from arriving at Mae Sai to being back in Thailand with your new stamp can be done in 3-4 hours.
Mae Sai Tips:
- Go on a weekday if possible—weekends see Chinese tour groups crossing for shopping, making queues longer
- Bring passport photos just in case (though I wasn’t asked for one)
- The border opens 6:30am and closes 6:30pm Thai time—don’t cut it close
- If staying overnight in Mae Sai (which I’d recommend—it’s a pleasant town), Piyaporn Pavilion Hotel was 600 baht and perfectly fine
Side Trip Option:
If you’re doing this visa run, consider spending 2-3 days exploring the Golden Triangle area:
- Chiang Saen: Ancient ruins and Mekong River views
- Golden Triangle viewpoint: Where Thailand, Laos, and Myanmar meet
- Doi Tung Royal Villa: Beautiful gardens and mountain views
- White Temple (Wat Rong Khun): Between Chiang Rai and Mae Sai, one of Thailand’s most famous modern temples
I did all of these over three days and it turned a boring visa run into a genuine mini-adventure.
Honest Assessment:
Mae Sai is perfect if you’re already in northern Thailand or want to explore that region anyway. From Bangkok, the journey time (12+ hours each way) doesn’t justify it unless you’re combining it with northern Thailand exploration.
Common Mistakes I Made (So You Don’t Have To)
Mistake 1: Not checking bank holidays
I tried a Nong Khai run on Thai Mother’s Day. The border was open but immigration was skeleton-staffed—waited 90 minutes for my stamp. Check Thai AND the destination country’s public holidays before booking.
Mistake 2: Forgetting USD cash
Nearly every Myanmar entry requires USD. I showed up at Ranong with only baht and had to exchange at a terrible rate. Always carry $50-100 in small bills for visa runs.
Mistake 3: Booking same-day return flights
My first KL visa run, I booked a morning outbound and evening return. Immigration queues in Kuala Lumpur made me miss the return flight. Always give yourself overnight buffer time.
Mistake 4: Not having onward travel proof
Thai immigration asked me for onward travel proof on my third visa run. I didn’t have anything booked. After 20 minutes of questioning, they let me in but warned me to have proof next time. Now I always book a refundable flight or bus out of Thailand before each entry.
Mistake 5: Assuming visa-exempt means no questions
Visa-exempt doesn’t mean automatic entry. Immigration officers can and do ask questions, especially if you’ve done multiple runs. Be polite, have your documents ready, and don’t get defensive.
Which Visa Run Should You Choose?
Choose Nong Khai/Vientiane if:
- You want the cheapest option
- You’re comfortable with basic travel
- You don’t mind 12-14 hour bus journeys
- You want the most proven/reliable route
Choose Ranong/Myanmar if:
- You’re in southern Thailand already
- You want the absolute fastest turnaround
- Geography matters (it’s the closest from Bangkok)
- You don’t care about sightseeing
Choose Penang/Malaysia if:
- You want to combine visa run with a mini-holiday
- You love food and culture
- You prefer trains to buses
- You have 4-5 days to spare
Choose Kuala Lumpur if:
- Budget isn’t your primary concern
- You value time over money
- You want modern city convenience
- You’re comfortable with air travel
Choose Mae Sai/Myanmar if:
- You’re exploring northern Thailand anyway
- You want authentic Myanmar glimpses
- You prefer less touristy experiences
- You’re in Chiang Mai or Chiang Rai
The Bigger Picture: Visa Runs in 2026
Thai immigration is slowly tightening enforcement. The days of unlimited back-to-back visa runs are ending. I’ve watched this shift over my eight runs—more questions, longer scrutiny, occasional rejections.
My advice for 2026:
- Limit yourself to 2-3 visa runs per year maximum
- Mix in proper tourist visas from Thai embassies abroad when possible
- Keep evidence of genuine tourism (hotel bookings, tour receipts, photos)
- Be honest with immigration if asked—“I love Thailand and want to explore more” works better than vague evasion
- Have a backup plan if entry is refused (which country will you go to instead?)
The visa run will probably remain viable for genuine tourists who occasionally overstay. But using it as a permanent living strategy in Thailand is getting riskier.
Do your visa runs. Explore these neighboring countries. But also respect that Thailand wants genuine tourists, not people gaming the system indefinitely.
I’ve learned that each visa run is an opportunity—to see new places, try different food, understand how borders work, and appreciate the privilege of